 When I first started taking this machine apart, I had a slight nagging feeling it would be very difficult to reassemble. I had no idea what I was doing, and therefore took pictures of absolutely everything from multiple angles. As the boiler more or less obstructed everything else interior to the frame, I saved it for inclusion at the end. So, at reassembly, I had a bare black frame and a pile of parts. The boiler, cable, and solenoid mounts I had painted white were the first to reattach to the frame. They were previously riveted on, but I drilled those out and used some screw/nut/washers that I picked up from Home Depot. They snugged in tightly and offered both a removable and aesthetic upgrade to the rivets.
I wanted to see the water level gauge in position, so I attached it next.
 It used a couple of permanent screw mounts welded to the frame that the washers and nuts tightened against to hold it in place. The next logical part was to add the group heads, which meant it was time to attach the stainless steel front panel to the frame. I made one slight mistake here. For one of the group heads, I had removed the rear threaded double-posts when I did the acid bath soak. The other one was so corroded, I couldn't extract it without damaging the threads, so I just left it in and scrubbed the rust off after it soaked. I didn't realize that one end of the post was slightly longer than the other and that was the end that needed to point out. I mounted it the other way onto the frame which resulted in less post to grip with the nut on the frame side of things, and a slight gap between the group head and the frame on the front side of the machine. After assembling the copper tubing to the group heads, this was less of an issue, and unable to loosen the posts from the group head I just left well enough alone.
 I added a few copper inlet and outlet pipes to the group heads, and mounted the hot water solenoid assembly on the upper mount.
This was my next mistake which actually occurred much earlier in the project. The assembly attaches by a small bolt that screws into the top of the brass assembly. I over-torqued it and sheared the bolt off inside the assembly. I dutifully went to Home Depot, purchased the smallest Easy-Out bit I could find, drilled out the center of the broken bolt, and promptly broke the higher tensile steel Easy-Out off inside the broken-off bolt. Further attempts to drill it out and re-tap the hole were considered too risky, so I instead drilled 3 additional holes on the mounting bracket, and used zip ties to hold it in place. Inelegant, but effective.

With the group heads securely holding the face plate on, and further bolstered with the inlet and outlet tubes, I incorporated the water inlet tap that mounts under the drip tray and began connecting the tubing and pipes that snake around to the back through the frame cut-outs.
 The water inlet tap mounts through a couple of holes in the bottom of the frame, but I held off securing it until I had the copper pipes and tubing reconnected. Speaking of tubing, I decided to replace the rubber surgical drain hoses that connected the hot water solenoids at the group heads as well as the drain from the boiler safety valve cap and the water inlet tap. I found it at Home Depot for cheap, but had to use clear vinyl tubing on the group heads since they didn't sell the surgical tubing in a small enough diameter. It may be one of those modifications I'll live to regret, but for now, it looks good and feels snug.

 I tried a dry-fit with the boiler in place to make sure all the connections were lining up right and it appeared to be okay. However, once I started tightening down the connections, I discovered the left side group head to boiler lower connection was tightened too far to connect while still retaining a solid seal against the boiler. I took the boiler out, backed the 90 degree connection out and found the very compressed remnants of a green rubber washer. I dug through the tool chest and found one to match the size and add hopefully enough resistance to allow a firm seal with the boiler and the correct angle to connect to the group head. It tightened down perfectly and I connected the group head connection and started adding the additional connecting pipes for the water level gauge, pressure gauge, etc...
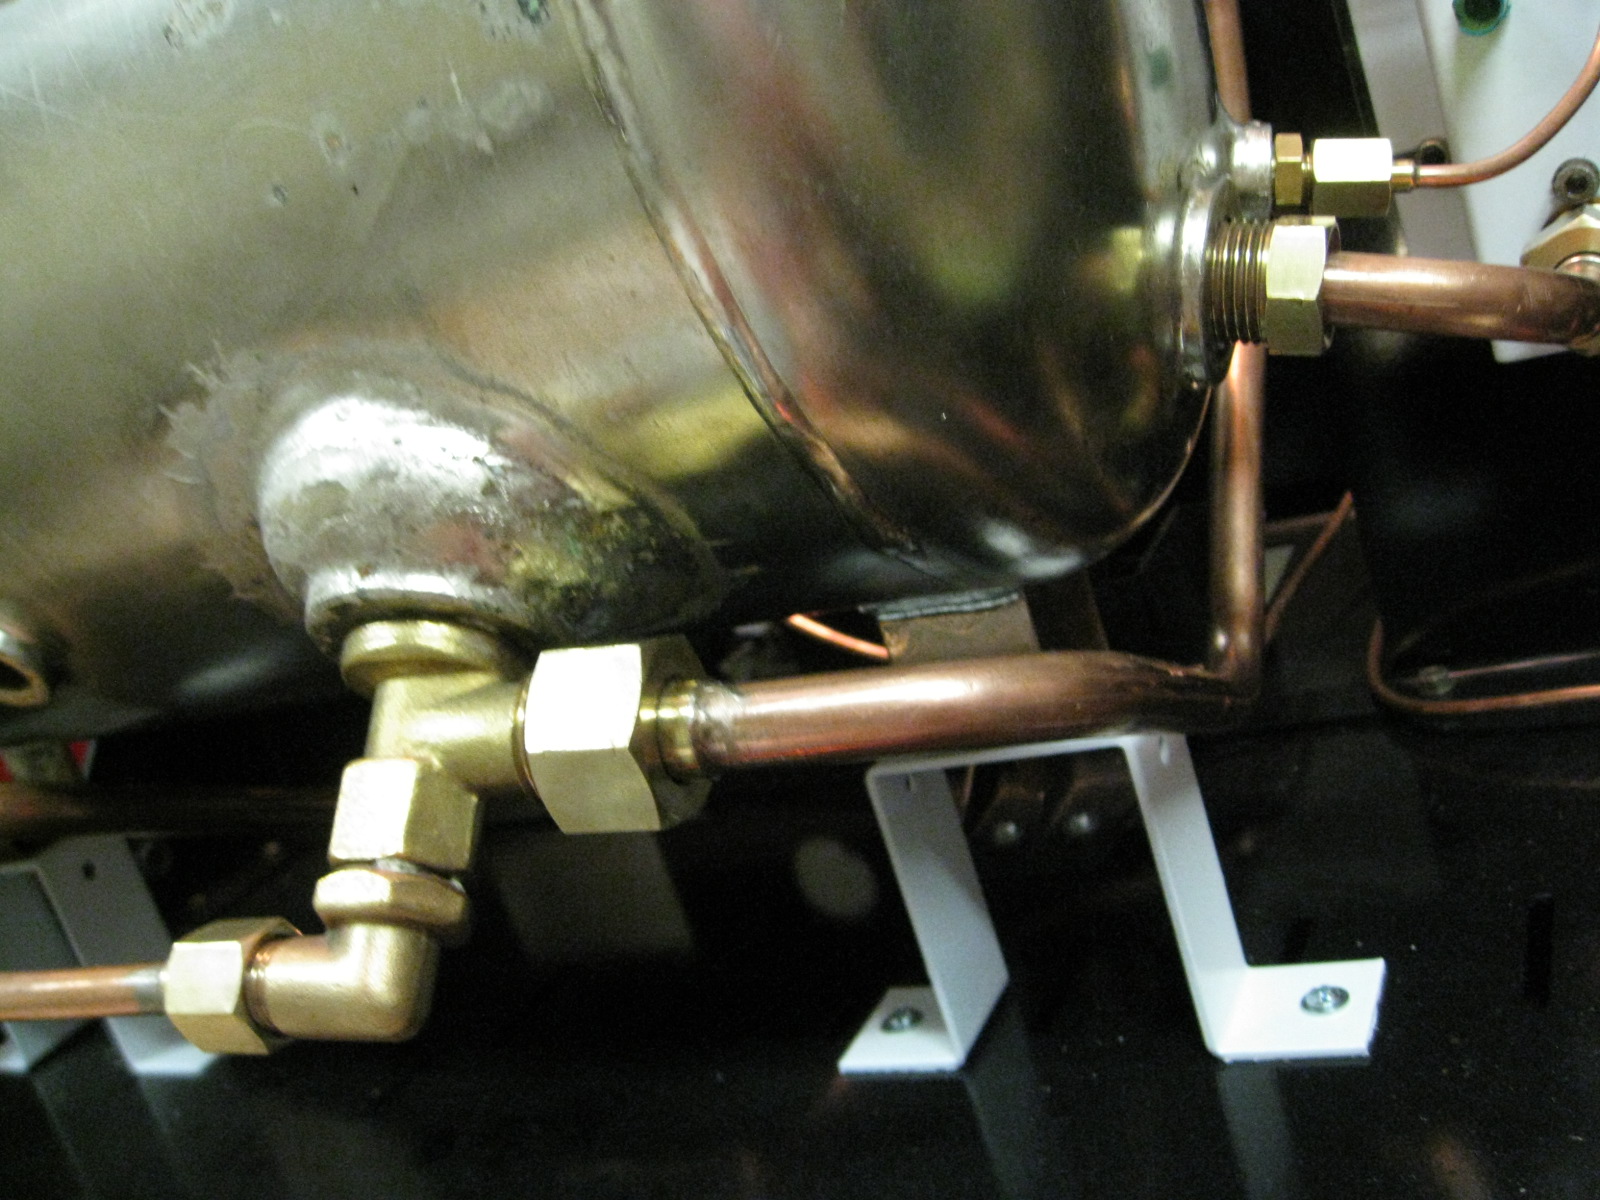

The water pump and motor assembly easily dropped into their position next and I secured the 4 rubber cushioned feet of the motor to the frame with the easily identifiable baggie labeled "pump motor mount hardware." I was able to reuse the stainless steel braided hoses, and I connected them to the main inlet connection and the water inlet tap. I snapped some pictures, but quickly realized after reviewing the deconstruction photos that I had them reversed. I swapped them out and all was well.

It was only a matter of minutes before I realized that I was out of copper pipes and that everything on the hydraulic end of things had been put back together. It was almost anti-climatic. I checked and double checked each nut and snugged them tight and decided to call it a day. The last thing left was to install the electrical parts, connect the solenoid plugs, and rewire the power switch box. I still needed to clean up the exterior panels, drip tray and cup trays, but the functional reassembly was nearing completion.

All in all, I think I had this put back together in about 2 hours. I've spent more time on Scandinavian furniture assembly, but it wasn't nearly as fun.
Hey this is really cool. I have found a similar machine on craigslist and am considering a similar project. Did you get it finished, I'd love to see the finished project, and hear some more about your overall experience as I haven't done anything like this either.
ReplyDeleteCurious how this ended up? Did it all work out? I've got one of these sitting in my garage I'm going to refurbish.
ReplyDeleteI have yet to test it. I finished the project shortly after my daughter was born and it wasn't that much of a priority. It's on my list to complete (test) by the end of the year.
ReplyDeleteI've just read your blog from beginning to end I'm fascinating at starting my own project. I picked up the same machine for $180 dollars and I'm dieing to take it apart. I didn't read where you were able to procure parts? Anything in North America?
ReplyDeleteI have had excellent success through www.espressoparts.com. They know their stuff, have OEM or equivalent parts, and know these systems inside and out.
DeleteI did finally get this installed in a friend's coffee house. It leaked horribly. I have yet to reclaim it from her to investigate, but I also recently completed my 2nd rebuild (Nueva Simonelli Mac Cup V), and based on her feedback, I wrapped every single threaded connection with teflon tape (plumber's tape). It (the Nueva) powered on and didn't have a single leak, but I'm still troubleshooting the boiler fill issue it had before I took it apart.
I say "Go for it!" You won't learn anything until you take that beast apart and start to understand that these are fairly simple machines to fix and reassemble. Excellent price at $180. I don't think I have more than $300 tied up in the ECM after ordering only a handful of parts to fix it.
I've tried contacting Burgess enterprises (formally known as) and I guess he's not in business or not willing to return my calls. Any luck with schematics? I have been able to get a parts manual but anything else would be helpful. I've got mine all torn down and it looks pretty clean. My only concerns right now are electronics. Schematics would be huge!
ReplyDelete